Must Know Tips for Dazzling Outdoor Photos
Whether you’re hot on the trail of an antelope galloping across the Serengeti, or trying to capture the perfect blade of grass in your backyard, great outdoor photography doesn’t just happen. If you’re looking to expand your artistic repertoire, there are some basic tools of the trade that every outdoor photographer should live by. It’s always wise to enroll in photography classes at Academy of Art, which will give you a platform to compare with others and build your abilities, but in the meantime, following these tips will help make your beautiful art more dazzling.
Sunny Side Down
Midday sun is the outdoor photographer’s worst enemy. Take a moment and think about the most beautiful outdoor photographs you have ever seen. Examine how the light licks the objects without enveloping them. When the sun is directly above you, the light it casts drenches the objects, creating stark shadows. These sharp-edged shadows mean your camera can’t properly capture the bright or dark sections of your photo, effectively turning your shot into an incomprehensible light goulash. This horrific exposure problem can be remedied by simply stepping into the shade. A shade-cloaked vantage point makes a delightful difference when it comes to light diffusion, and now the background can be overexposed without detriment to the composition.
Grab A Polarizing Filter
If you want to shoot anything outside, a polarizing filter is your ticket to undiluted beauty. Using a polarizing filter gives you the ability to only let light in from certain angles. You have the power to rotate the filter to your liking, which allows you to remove any unnecessary glare. These handy dandy kings of the filter world also allow you to control reflections from water or other shiny things, while darkening the sky. With a polarizing filter, you become the master of light, improving everything from small details to the quality of your overall composition.
Stay Golden
Shooting in midday light can be a nightmare, but shooting in the golden hours is a dream. The golden hours refers to the hour after the sun comes up and the hour before it goes down. These “sweet spot” hours catch the sun at its mellowest, when the light drips the most beautiful myriad of colors across the earth. The natural shadows and highlights do a remarkable job of capturing your subjects and landscapes in an ethereal glory that would otherwise be drowned out by the starkness of the midday sun.
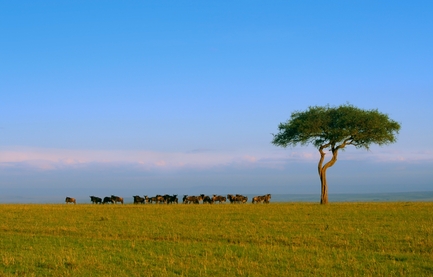
Look To The Horizon
Unless you’re outside taking photos somewhere in space, there’s a pretty good chance there will be a horizon to consider. The horizon has the ability to drastically increase the allure of your photos, or suffocate them into the throwaway pile. Ensuring the horizon is straight, unless there’s a reason for it not to be, is one of the most important things to consider. From there, the placement of the horizon should depend on the content of the frame. Use common sense, if the sky is alight with heavenly clouds, lower the horizon. If your focal point is a herd of roving wildebeests, heighten the horizon to showcase them. Horizon placement has the ability to change the tone and emotion of a piece, so place it wisely.
Find a Natural Frame
Nature and manmade structures alike, you will find an abundance of unintentional, yet striking frames for your photos. Framing is when you use one object to “frame” the subject of your image. If you’re shooting a gaggle of geese waddling through a snowy meadow, use the ice-encased birch twigs in the foreground as a subtle frame to add depth to the geese winter walk. If you’re photographing a cityscape, use a bike rack or sculpture to frame the buildings in the background. The results will be rewarding, artistic and edgy.
Whether you are a novice photog with a love of nature, or a seasoned professional,the true artist always seeks to enhance their craft through trial, error and study.